Sunday, November 13, 2011

Kids Kooking: Sunrise Cupcakes

I call these sunrise cupcakes because that's what they ended up as, though really the original intent was to be orange and yellow "striped" cupcakes for Halloween. Regardless, I wanted something fun and easy that my four year old could help with (along with a friend), so I adapted an idea I saw around YouTube for "rainbow cupcakes" (just do a search, you'll find plenty) and tried to do my own thing.

Overall, I wouldn't call this a failure by any means. First of all, it's a great project for young ones. You just take box cake mix and prepare it as usual. Of course, let the kids crack the eggs because all the fun is right there! Once mixed, divide the cake batter into equal portions in ziplock bags and add some coloring. Mix around til you get the desired hue, then cut the corner off the bag and pipe colors into the muffin cups as you like.

I think the reason these cupcakes didn't work out quite perfectly is because of the use of two colors. It makes sense that the colors "round out" in the final product, and when it's a rainbow you still see multiple shades. However, using just two colors, you get the sunburst effect you see above.

They still look great, and taste delicious. Try it with your kids in whatever colors you prefer.

Saturday, October 29, 2011

Happy Halloween {Ghost Cake Pops}

I thought I would jump on the cake pop bandwagon. I mean, why not? It seemed super easy and kind of fun. I tried a first batch for the baby shower, but those didn't work out how I wanted. So rather than bore you all with the recipe (they can be found all over the internet, pretty much the same method everywhere), I thought I would share my tips for success.

1. Don't use too much frosting. The first time I made cake pops, I put the whole can of frosting in and they were just too wet. Cake pops, by nature, taste (to me) like not-fully-baked brownies. So they are going to be super sweet and gooey no matter what you do. No need to make the matter worse by putting in too much frosting. Start with about 1/2 a can and go until you feel you have a consistency just sticky enough to keep their shape.

2. Freeze the cake balls on the stick before coating. The first time I made these, I just refrigerated them and none of the pops would actually stay on their sticks. The second time, I put them in the freezer and they were much more successful. However, with this in mind ,I realized that to take all of the pops out at once, some of them were 'thawing' too much before we dipped them. So if possible, leave the pops in the freezer in batches until you are ready to dip. (The pops seem to stick just fine once you're all done.)

3. Make sure your candy coating is thin, thin, thin. The fact of the matter is, if the candy is too think, you are going to get clumpy, lumpy blobs. I added shortening to thin mine down and it worked great, but you can also just use liquid veggie (or some other flavorless) oil.

4. Do not overheat your candy coating. Yes, the stuff can burn, even by putting it in the mircowave for one minute at a time vs. the 30 seconds suggested. Perhaps I know from experience. It didn't taste terrible, but it did make some little lumps in the candy. (I didn't want to waste anything so in the pictures you can actually see a few ghosts with this "burnt candy" result).

5. Experiment with tools to decorate. My friend splurged and bought us the edible markers to draw faces, and that just plain didn't work. I'm not sure why, but it made it near impossible to see. Instead, we used tubes of gel frosting color.

6. Use this project to teach the love of food and baking early. This is a great and easy project for kids, and these two four-year-olds had a blast. It's hard to get it wrong when one of the directions is "crumble a giant cake."

So there you have it. All my tips from my failed and mildly successful attempt. If you want full instructions, I recommend watching this video by cakeb0t.

Happy Halloween and enjoy!

Sunday, October 23, 2011

Shower Power

Last weekend I threw a baby shower for a friend, and I kind of went all out on the baking. I mean, what better gift exists than something homemade, and baking is currently what I feel I do best. Plus it gave me an excuse to try out some new cake decorating tools (i.e., teach myself how to actually pipe frosting).

So by the mom's request, I made a revised version of my original from-scratch cupcake creation, the lemon curd wonders. I used the same lemon curd recipe as before, just lots of egg yolk, butter, lemon, and sugar, but this time I used a scratch version of My Baking Addiction's lemon meringue cupcakes. I finally splurged and bought some cake flower, and I saw a huge difference in my cakes. Seriously, I may have been the last to figure this out but it is worth it to get the cake flower. It solves the problem of making the cupcakes feel heavy like muffins. The cupcakes were light and moist, and I was super pleased with the end result.

For the frosting, I just made some homemade cream cheese frosting (my favorite staple) and finally let me Kitchenaid run beyond speed two. This made a huge difference in how creamy the end product was, and I was very happy with it. Then some gel food dye and two different Wilton piping tips and you get a pretty decent beginner cupcake. Though I have to say, it's all in the presentation. The cupcakes wouldn't have looked half as nice if it wasn't for that amazing cupcake stand that a friend let me borrow. Note to self: purchase a cupcake stand.

I was feeling a bit off because there wasn't any chocolate on the menu (and how can you not have chocolate for a shower?) so I threw together some chocolate covered strawberries. Talk about simple, delicious fun. Using two colors makes all the difference, and it really doesn't add much more work. They were a hit, and I think everyone was very happy with the final results of this venture.

Saturday, October 8, 2011

Marshmallow Fondant

So I was gifted this really awesome "Zombie Cupcakes" book as a gift and while flipping through the pages I saw a "Biohazard" cupcake that looked absolutely perfect for my tech-industrial sister. The book, of course, made it look so easy.

The cupcakes were straightforward, a key lime mix that actually was more like a muffin consistency (very heavy) in the end rather than a cupcake. But this was my first foray ever into fondant and I was intimidated, to say the least.

I had talked to a friend who once dated a baker, and he suggested I use marshmallow fondant. So after a search I found this recipe on allrecipes.com and decided to give it a try.

Making the fondant was a challenge, not because it's actually tricky but because it is a sticky, sticky mess. I mean, let's think about it. Hundreds of melted marshmallow with nothing between you and them except for some powered sugar? It's a bit insane. But trust me from my lesson learned: When you feel like giving up just add and knead, add and knead. It will get there eventually.

So after all the work I got the color I wanted and some pretty tasty (surprisingly) fondant. I was patting myself on the back for this and thinking that I am a magnificent baker.

Then it came time to cut and mold.

Let me say this now and say this clearly. Do not do this without the right tools. Secondly, toothpicks and butter knives are not the right tools.

You can see my failed attempts at the biohazard sign here. I have since this time ordered Wilton's "fondant student kit" and will be going through the motions. Then we shall see who rules!

Til then, just know I found a good recipe and still have a lot to learn.

Sunday, September 18, 2011

Super Easy Lemon Cream Cheese Pound Cake

This was by far one of the easiest creations I've ever made. You really just have to love the tasty simplicity of anything that goes into a bundt pan. Using a recipe that I found from MyBakingAddiction.com, I prepared this cake for my parents' summer picnic.

Creamy batter just all mixed together.
 It doesn't get easier!
There really wasn't a tough thing about this recipe, and a little truly goes a long way. One thing is for sure, they call it pound cake for a reason. I served this with fresh strawberries and whipped cream, though I think in the future I'd try to even make it lighter. I've been reading a lot about the mechanics of baking in my Alton Brown book lately too and this would probably be a great candidate for trying cake flour rather than all-purpose. Something just needs to lighten this puppy up!

That all being said, this was actually the first cake I've gotten a paid request to duplicate. So heavy to me, I must have been doing something right. Try it for yourself and hope you enjoy!

Wednesday, September 7, 2011

Homemade Lasagne Noodles

Once a long time ago I had successfully made lasagne noodles with help. I think I had done it quite a few times, and now that I'm trying on this "baking" hat I thought I would go for it again.

Unfortunately, it didn't work quite as I had hoped.

I started with the traditional well and mixed all of my ingredients together. I got my tight little ball in plastic wrap and I was feeling really good about myself. Rolled it out, and the noodles looked great.

But when it came time to eat, they were doughy. I just don't know a better way to explain it. They just tasted like they weren't quite cooked at all.

I'm not sure what I did wrong and I can't find any assistance on the Web. My best guess is one of two things:

1. I put too much sauce in my lasagne (I do like a lot of sauce) and this over-saturated the noodles.

2. I needed to boil/cook the noodles before I placed them into the casserole. I forget that not all noodles are now bake-ready like the spiffy new box kind.


 So I think I'll try again soon but with some cooked noodles before I bake. If anyone knows if this step is necessary, I'd appreciate the feedback. I baked for 30-45 minutes at 350 or so. So I'm not sure that they were underbaked, but I suppose that was a possibility too.

Wednesday, August 31, 2011

Crossing the Threshold

So I have begun trying to actually educate myself about this new hobby of mine, and to do this I picked up a few theory or almost textbook-like tomes. The one I have started with is by Alton Brown, that mad scientist of cooking that many of us love.  Thus far, I have only gotten so far as the introduction, but that has already been enough to get me thinking a bit differently about baking.

One of the biggest suggestions that Alton makes is to begin weighing your ingredients rather than measuring them. Particularly in baking, where formulas are so balanced and important, you need to get the proper ratio. And when you can delicately scoop or tightly pack a cup or flour to make your loaf of bread, if we all were to use digital scales to measure the same 5 ounces we know we'd be making the exact same pastry.

I see his point. My question is: Am I ready to commit?

This is a big step from casual baking to all-out geekery I think. From art to science perhaps? Maybe not, since in my own little world I sort of view all baking and cooking as art. But it's well beyond "a dash of this, a pinch of that."

$30 will change my baking world. Now to decide whether or not to do it.

Monday, August 15, 2011

Uberbrownies!

So this weekend I finally baked something perfect. These yummy, fudgey, delightfully delicious brownies that everyone who taste-tested seemed to love.

Of course, this means it was the one time that I didn't take photos.

Suffice it to say, because I know these work I'm going to take the base recipe and remake, revise, experiment. And in the future I will be certain to take photos. In the meantime, here's the recipe, adapted from something I saw on mykitchenaddiction.com:

Ingredients
1 1/2 sticks unsalted butter
2 cups sugar
1 cup cocoa powder
1 tbl vanilla extract
1 tsp (or so - I never measure this) cinnamon
1 tsp salt
1/2 tsp baking powder
3 eggs
1 cup flour
1 cup semi-sweet chocolate chips

Directions
In a saucepan over medium heat, melt butter and add the sugar. Then cook it a bit until it basically becomes a big pasty yummy glob.

Remove from heat and add cocoa powder, vanilla, cinnamon, salt, and baking powder. Add the eggs and stir until creamy.

Mix in flour and add the chocolate chips, then pour the whole gooey delicious pile into a greased 9x13 pan. Bake at 325 for about 30 minutes

Thursday, August 11, 2011

Chocolate Chip Scones

One of my favorite pastries is the scone. A little sweet, a bit dry, and totally tasty and delicious. Well I had some leftover chocolate chips lying around and I was tired of making the same old cookies so even though my favorite scone is of the blueberry variety (so traditional, I know), I decided to try an adaptation of this scone recipe I found on allrecipes.com.

Now if you've ever used Allrecipes you know the importance of reading the comments before baking. I chose this particular version because of it's high ratings and positive comments, plus I liked the touch of orange juice that was listed in the ingredients. I also altered the butter and liquid content a bit based on the comments. The dough, as you can see from the pictures, looked to me like it was perfect.

The finished scones looked pretty good, and I got some great feedback from my taste testers. However for me, the final scone was too "biscuit" tasting. When I think of scones, I typically think of something smoother in texture. I don't know if it's correct, but I like the Starbucks scone. These were more crumbly inside, which could possibly be altered just by using more liquid. More specifically, I'll probably just try a different recipe next go-round and see how they compare. But these weren't a bad experiment, and I'm happy to report all were eaten and enjoyed.

This did add a note to myself: buy coarse sugar! So many "hearty" baked items that have the faint sweet flavor need those yummilicious crystals on top.

Wednesday, August 10, 2011

Bad Baking Blogger

So the truth is that I am doing a good job of practicing my baking, but a horrible job of blogging. I have about five projects that I have worked on that I need to update everyone about, including Chocolate Chip Scones, Homemade Lasagne Noodles, Guiness Cupcakes, and more. I am going to make a concerted effort to get to these soon, and to get this blog back on track!

Also, I have a few ideas I want to try to make shortly, including a cannoli pie, a strawberry tiramisu, my dad's homemade pizza dough, and a few others. I also want to work quite a bit with muffins, and see if I can come up with some unique ideas that are a strange hit. For instance, I was thinking bacon muffins with chocolate drizzle.

Finally, I have two new baking books that I received for my birthday that I am going to begin studying. I am hoping these can give me the tools I need to make my own unique creations, instead of trying to copy online recipes all the time (there will always be a place for that of course!).

Hopefully, you will all get to see the results of this soon. Ideally, I will bake at least twice a month, with a greater aim of once every weekend.

So those are the plans. I hope to be a better baker - and a better blogger - in the very near future.

Wednesday, June 29, 2011

Parmesan Crusted Chicken

One of the things that has been bothering me quite a bit about my recent addiction to baking is all the fat and calories that I've been packing in. Sure, I have my group of favorite and adored taste-testers, but I can't help but snack on these items myself.

So I am going to try to commit to making some more "meals" rather than desserts. I'm sure that the ratio will still stay about 3:1 dessert to meal, but it's a goal to work towards.

This one is actually an old standby I learned from my dad. Super simple and easy, and it's really delicious.

Start by taking a big mixing bowl and mixing together Italian-style bread crumbs and powdered parmesan cheese. I do about 1 part cheese and 2 parts bread crumbs. Then, because it's my style, I throw in some powered garlic and pepper for taste.

Next I take boneless, skinless chicken breasts and pound them out thin. For me, this helps them bake faster and makes them more palatable since I'm not really a huge fan of meat (I prefer veggies and starch). I  rinse the breasts and without seasoning them any more or coating them in anything (I think this helps cut down on fat content and the like) I just roll them in the crumb mixture.

I transfer the breaded chicken to a baking pan sprayed lightly with oil, then bake them for 20 minutes at 400 degrees. In my oven, anything longer than 20 minutes dries chicken out, so this is why pounding them thin helps.

An easy side dish to accompany this is to take egg noodles and boil them, drain and throw butter on them, and then coat them in the same bread crumb-parmesan mixture (make a fresh batch, don't use the stuff you rolled the raw chicken in). And of course, in our house broccoli is a huge hit.

There you have it. Quick, easy dinner.  Hope you enjoy.

Wednesday, June 15, 2011

Catching Up with Bread Pudding

So I've actually been baking quite a bit but have been sloppy about the blogging. One dish I made recently was a super easy version of bread pudding. I tend to buy way too much bread for just my daughter and me, and I'm always off to the pond feeding leftovers to the geese and ducks. However, one evening I was in the mood to bake and had a whole loaf of plain white Wonder bread leftover that was slightly stale. I saw something on tv about a bread pudding and thought I should give it a go.

Turns out this is one of the easiest dishes in the world to prepare. From start to finish it literally took about 15 minutes, if that, to assemble and then I just baked and ate. It's true that white sandwich bread is not the best for this recipe, as it turned out even soggier than I expected. Also, the recipe that I adapted from allrecipes.com (I think I used a little less sugar and added craisins) made a pudding that was just a bit sweeter than I would have liked. But I now have a basic starter idea to move forward with and a handful of willing taste testers for future endeavors. I'm definitely going to try some new versions of bread pudding when I have a different kind of bread to try it with. Luckily, I almost never buy white bread anyhow!

Next time you have some leftover bread, I definitely suggest giving this a try just to see what you think.

Saturday, May 14, 2011

Berry Birthday Cupcakes

Berry Birthday Cupcake
My little Bean just had her fourth birthday and somehow quite by accident I managed to share my love of baking with her. So when I asked her what she wanted for her birthday she very quickly popped out the current favorite flavor: Strawberry.

I love strawberries. But I have a super strong aversion to anything "fake" strawberry or strawberry flavored. For me,it just tastes too sweet or sickly and I can't stand it. So my challenge was how on Earth to honor her request while still making something that I would be happy to eat as well.

So I devised a plan to include fresh chopped berries inside a homemade cupcake, and Tada! The Berry Birthday cupcakes were born.
Bean is a good helper

Since this was the little girl's own special day, I decided to let her help me in the process. Which is important because I think that part of the reason my daughter will eat so many great things is because I let her take part in the creation process. I mean, how many kids do you know who choose oranges over french fries, broccoli over mashed potatoes? Heck, even her mom doesn't do that (shhh, don't tell her) but my little girl does and for this I'm eternally grateful.
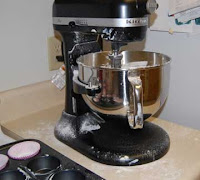
But with her help comes a massive mess

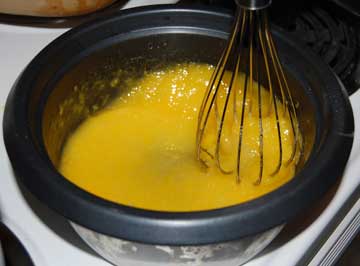
So Genna and I went to work. We made our own variation on the Nordic Ware Cupcake book's Lemon Cupcake, making it from scratch. I measured, my helper dumped, and as you can tell there was quite a mess.

The cupcakes came out pretty good actually. But there is something off about the consistency than what I'm used to with regular box cake mix. Perhaps they were denser, more like a muffin or crusty top like a biscuit, but they were scrumdiddlyumptious. However, I might experiment with cake flour going forward, just to see how that works out.

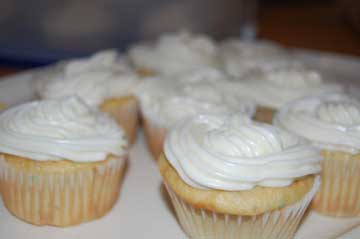
Berry filled cupcakes
So then I chopped up the strawberries (no kid help here) super fine and added some blackberries I had on hand to add a bit of juice and color. I didn't sugar them, and I'm still not sure if that was the best plan. The end product tasted good, but the tart was a bit of a surprise in contrast with the lightly sweet cakes. However, look how nice these looked. If anything, before frosting they were a visual masterpiece.

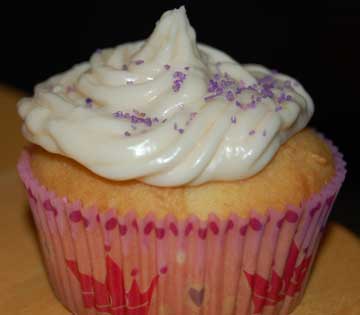
Some look good, some look awful
Of course, for most people, no good cupcake is complete without frosting. Perhaps the problem is that I don't like frosting much. And maybe the frosting 
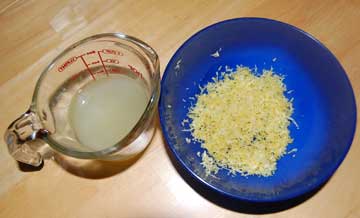
knew and wanted to thwart me. Regardless, I followed the accompanying Nordic Ware recipe for a lemon buttercream frosting. The first batch seemed ok, but while trying to put the frosting into the pastry bag, I managed to get the stuff all stuck to the sides and I ended up with a gloopy mess and only about 5-6 frosted cupcakes from the whole batch. By the time round two of frosting came, I don't even know what went wrong. I followed the same recipe exactly, except I subbed bottled lemon juice for the real thing (I was getting stressed and impatient). The end result was something runny that coated like a thick glaze more than a yummy frosting. So, you get an end result that basically looked like a raging mess.

Should have kept them without the frosting, huh? Well, for a first attempt I'm not too let down, though I definitely need to practice the art of frosting - both making and decorating. But I think back on the fun I had making the cupcakes, and I realize this face licking batter made it all totally worth it.

Happiness a la baking


Sunday, May 1, 2011

Lemon-Filled Spring Cupcakes

So budgets are tight these days and my solution to this problem is to bake all of my presents. So when my dad's birthday came around, I knew it had to be special. He's a cake connoisseur after all.


What's more, I thought the best way to go about baking would be to have a party. So I invited some besties, threw on a few movies, opened up a bottle of wine and got to baking.


First I admit I totally cheated and used boxed cupcake mix. I used a "springtime" funfetti mix, so the colors were more muted. And I hollowed them out for the important, homemade stuff to come.


Then I decided I would try my hand at making lemon curd. Lemon juice, zest, sugar, butter and eggs... how hard can it be? Well apparently pretty hard when you add the butter in at the wrong time! So I scrapped that batch and went for round two. All in all, it turned out great. 


I let this chill overnight, so I actually didn't do the filling until the "afterparty" I held alone the next day. But they looked pretty good when it was all done.

Then I made some homemade cream cheese frosting with some lemon juice and lemon curd thrown in for extra taste.


I had a brand new little pastry bag set, bought for me by the amazing John, but my untrained hand only made a semi-professional looking cupcake. Still I don't think they looked too bad if you asked me.


Everyone who ate these said they were amazing. My comment, is that the cake needs to have a bit more flavor to combat the tartness of the lemon curd. But for a first effort, I'm pretty proud. Thanks to mykitchenaddiction for the lemon curd recipe, and mybakingaddiction for the frosting recipe that I adapted a bit to make my own.

Monday, April 18, 2011

And so it begins...

For months while I have been dealing with anxiety and other things, my friends have urged me to find a hobby. Well, without even trying it seems that I have, and I am completely smitten with baking and other food endeavors. I have created this blog to catalog these adventures. However, the name is key. I tend to throw myself head-first into every hobby and then quickly lose interest once things get tricky. I'm hoping this time it's different, but just keep in mind that the blog is called "The Flakey Baker" for a reason. I did have a very successful baking weekend though, so once I get the photos uploaded I'll get cracking. I hope you enjoy, and if you have a request, let me know!